
Shopping Cart
There are no more items in your cartOur Most Affordable MESH Solution, and it’s Wi-Fi 6!
- Johan Koekemoer
- Latest News
- 0 likes
- 3936 views
- 0 comments
Choice, as a consumer, is a good thing, as it allows even the most frugal of us to study every datasheet, and compare models, benefits, features, and technologies against each other to make a buying decision.
However, for those of us who simply do not have the time, or the technical knowledge to decide on the information overload we need a review or a salesperson to give us the right solution, so hopefully, this is such a review.
I tested our ZTE Wi-Fi routers, especially to see how easy the MESH is to set up. I have been working in the ICT sector for more than 10 years and have had the privilege to work with various Wi-Fi, Networking, and Wireless equipment. As a Certified Trainer on Enterprise Grade Wi-Fi, I have to say, this has been by far one of the easiest MESH systems I have worked with, and at this price point, makes it our most affordable MESH Wi-Fi yet.
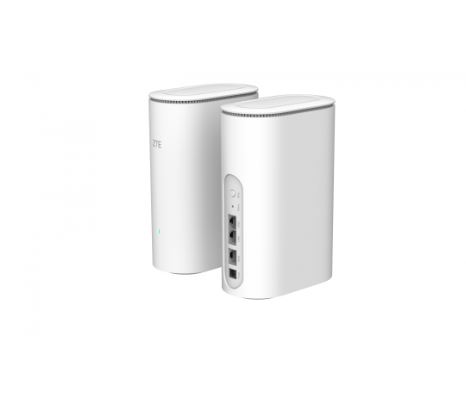
The first ZTE router was unboxed, and powered on and the LAN cable from the existing home router was connected to the ZTE H3601 External’s WAN port.
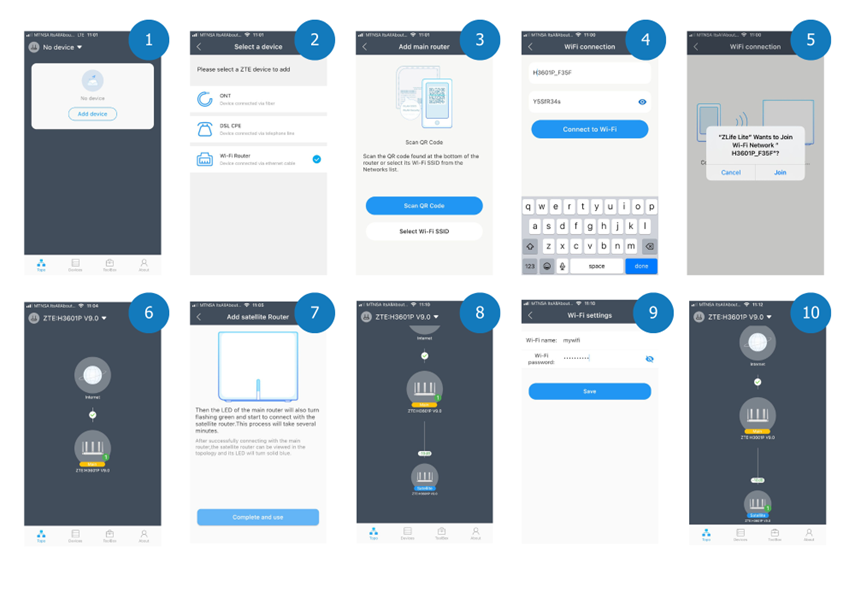
The next step was to grab my iPhone to install the ZLife Lite app from the App Store, which is also available for Android. The app itself is very lightweight and installs in less than a minute.
Once installed, the App guides you through the setup procedure, especially to onboard the first unit. This was achieved by connecting to the SSID underneath the unit, a little old school, but why break something that works? From there, the router was connected to the Internet and the app instantly asked if I wanted to add a satellite node. So, I proceeded to power up the second unit where Wi-Fi coverage is needed. On the app, I selected the option of adding the satellite node (H3601P Internal) and was prompted to press the WPS/MESH button on the router. The LED flashed red on the satellite node and once connected will stop flashing and turn a sold green.
Here are some screenshots of the steps on the ZLife Lite app:
With the MESH units setup, what is next?
- Both units are still announcing the default SSID, to change it I navigated to the toolbox option, selected Wi-Fi Settings, and entered a new SSID name and password. Once changed, the devices will update the changes, I was disconnected but almost instantaneously asked if I wanted to connect to the new SSID, which I thought was cool.
- What about Network Optimisation? This is a feature that I have only encountered on Enterprise Grade Wi-Fi applications. This scans the Wi-Fi environment and automatically adjusts the broadcast of your SSID to an optimal channel, with less interference. Simply, it means that the router listens for interference from other devices, and automatically selects the best channel to operate on, ensuring optimal performance on your Wi-Fi.
- Other options in the toolbox include router settings, parental controls, user password, router check, blacklisting, DHCP Server, and Ping Test.
Overall, it took me longer to write this review than it took to set up the ZTE H3601 External and H3601P Internal devices.
Why not test it for yourself? I guarantee that you will be surprised by the simplicity, price, and performance of the ZTE H3601P units.
Comments
View Comments