Shopping Cart
There are no more items in your cartUniFi - Social Media Guest Authentication
- Megan
- Latest News
- 0 likes
- 8577 views
- 0 comments
This article provides the steps to enable guest authentication with Facebook and Google+.
Notes and requirements
*Applicable to UniFi Controller 5.4.2.1 and later
* In order to use 3rd party guest authentication, your controller must be running on a publicly accessible domain. This is required for Facebook/Google to communicate with the guest portal.
The domain the controller is on will be referred to as “domain”, or “domain.com” while the individual subdomain that the controller is run on will be referred to as “subdomain” or “sub.domain.com”
Start by creating a Facebook app, Google+ API login or both.
https://developers.facebook.com/docs/apps/registerFacebook App Setup
1.Register a Facebook App
Use the guide HERE to register a Facebook authentication app. Step 4 asks the user to choose a platform for the application. Select Facebook Canvas

2. Complete Facebook Canvas Quick Start
You will be directed to the QuickStart for Facebook Canvas. Enter an App Name in the provided file to begin. After completing the Quick Start, click Skip to Developer Dashboard to continue.

3. Go to Settings
Click Settings in the sidebar to open up the basic app settings:
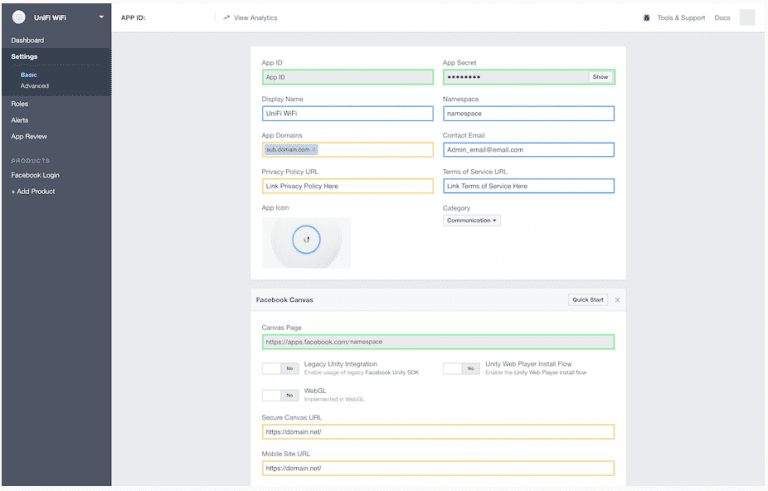
4. Edit Settings
Settings in Green are established by the Facebook development tool:
- App ID: Number assigned to your app. Will be used in UniFi Controller setup.
- App Secret: Password assigned to your app. Will be used in UniFi Controller setup.
- Canvas Page: Automatically reflects the app Namespace.
Settings in Blue are admin-specified, and should be chosen to reflect your preferences:
- Display Name: This name will be displayed when clients authorize via Facebook.
- Namespace: This name will appear in the URL when clients authorize via Facebook.
- Contact Email: use an email that the admin has access to.
- Terms of Service URL: Optional. Include URL of the network’s Terms of Service here.
Settings in Orange must be correctly entered for proper functionality
- App Domains: Enter your controller subdomain here.
- Privacy Policy URL: Include URL of your network’s Privacy Policy here.
- Secure Canvas URL: Enter your domain here.
- Mobile Site URL: Enter your domain here.
Toggles on this page may be left on NO. Click Save Changes to apply the settings.
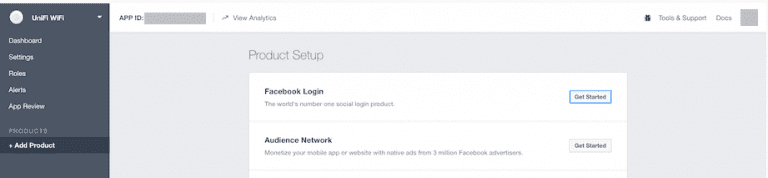
5. Add Product
Next, click Add Product, then Facebook Login to create the login page.
6. Add Controller Subdomain and Port
Under Facebook Login Settings, include the controller subdomain along with port 8880 (Or 8843 if you are using Secure Portal), and use the following toggle options:
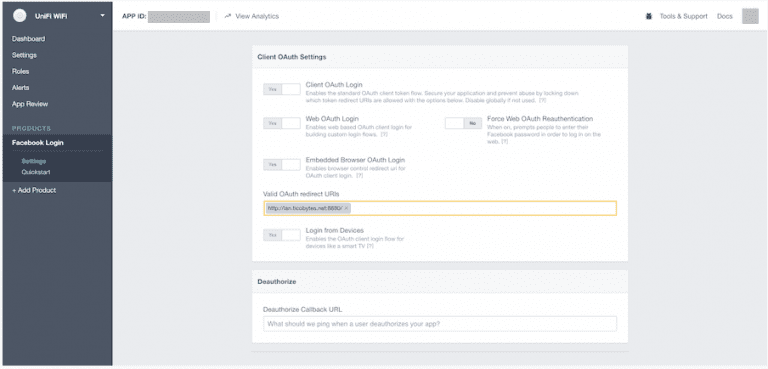
7. Save Changes
Click Save Changes to apply the setting. If you are setting up Google authentication as well, continue reading. Otherwise, skip to Controller Setup
Google+ API Setup
Use the Enable the Google+ API Guide HERE to enable Google login.
Step 6a in the above guide prompts the admin to enter the app origin. In this case, it will be the subdomain, followed by port 8880. Note the Client ID and Client Secret, which will be used later in the Controller Setup
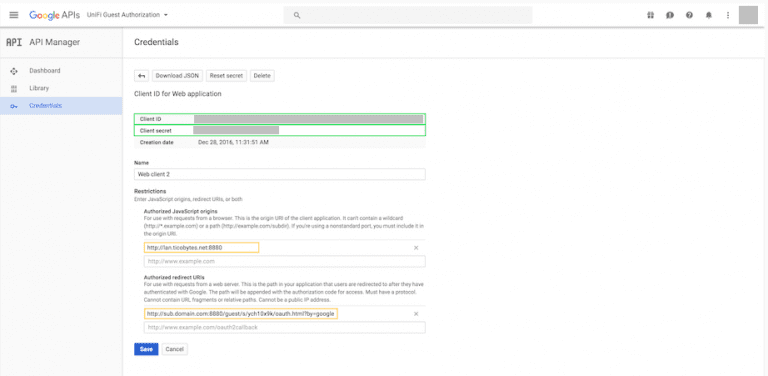
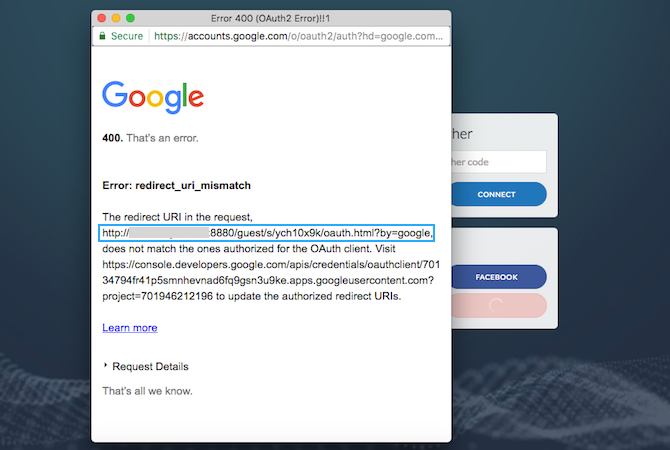
Note: If the client device gets a redirect error after setup, add the redirect URI below under “Authorized redirect URIs” in the above step:
Comments
View Comments