
Shopping Cart
There are no more items in your cartA quick how-to-guide on configuring your Cambium Force 4525L in a PtP setup
- Johan Koekemoer
- Technical Tips & Guides
- 3 likes
- 2280 views
- 0 comments
The CB-EPMP-F4525L is a high-performance subscriber module for Point-to-Multipoint (PtMP). This 802.11ax, 5GHz device can also be used in Point-to-Point backhaul applications. With a high gain, 25dBi dish antenna and support for multiple Quality of Service (QoS) levels, it makes it ideal for VoIP, video and data backhaul scenarios.
In this quick how-to guide, we will show you how simple it is to configure the access points and the connected subscriber module to form a stable, high-performance link.
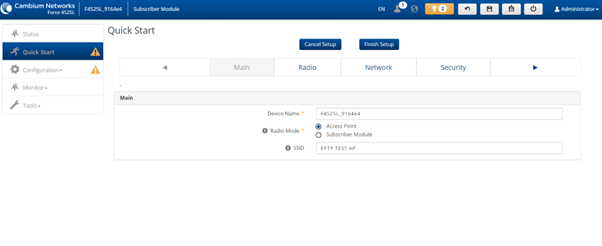
To start, access the first radio that will act as the AP through the default IP address of 192.168.0.1.
From Quick Start, ensure that the Radio Mode is set to Access Point and enter the SSID that the SM will connect to.
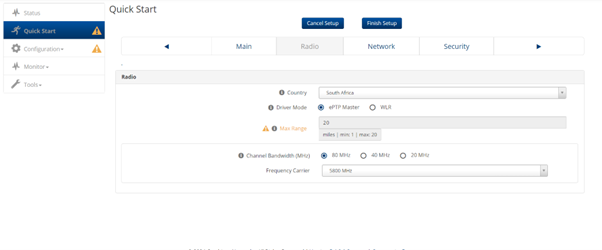
From the Radio Tab, ensure that the Country is set to South Africa. From the Driver Mode option, select ePTP Master. From the Channel Bandwidth (MHz) you can opt for either 80MHz, 40MHz or 20MHz. When selecting the channel bandwidth, keep in mind that larger channel bandwidths do provide higher potential throughput, with the drawback of distance limit. Lower channel bandwidths will provide greater link distances, with reduced potential throughput. From the Frequency Carrier drop-down, you can select the frequency of operation. We highly recommend that you use the built-in spectrum analyser at both the AP and SM to get the best frequency of operation that is clear from interference.
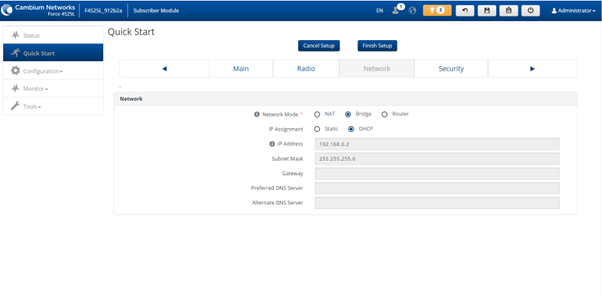
From the Network tab, you can opt to either use NAT, Bridge or Router mode. NAT (Network Address Translation) will be used when you have one WAN IP address is used to source Internet to Multiple LAN IPs. Router mode means that you are routing a subnet from the WAN to the LAN side. In our lab environment, we required a transparent wireless link and opted for a Bridge connection with the IP assignment being received via DHCP.
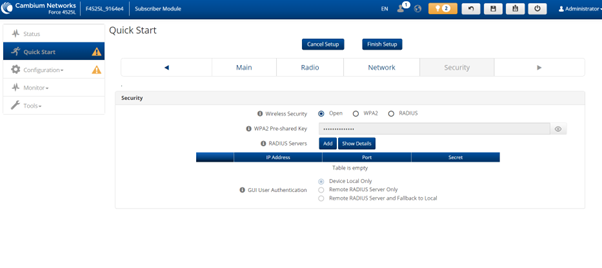
From the Security tab, you can select either Open (no authentication), WPA2 (authenticate using a pre-shared key), or Radius (authenticate using a username and password). We recommend using WPA2 with a pre-shared key to allow the SM to authenticate with the access point.
Once all the changes have been made, you can click on Finish Setup and continue with the SM configuration.
To configure the Subscriber Module, access the unit using the default IP address of 192.168.0.2.
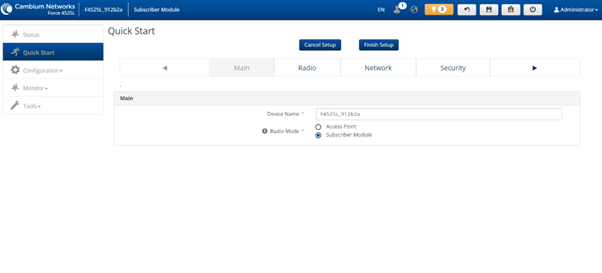
Under Quick Start, ensure that the Radio Mode is changed to Subscriber Module
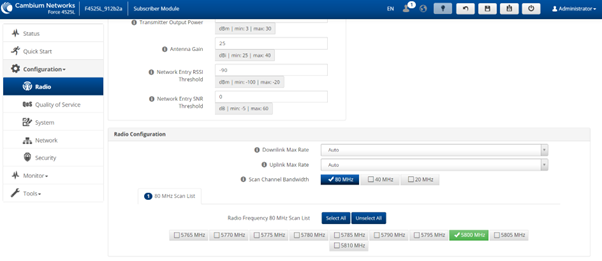
From SM Radio Configuration, ensure that the following options match the configuration of the AP:
- Scan Channel Bandwidth
- Radio Frequency Scan List – here you can select the specific frequency or select all.
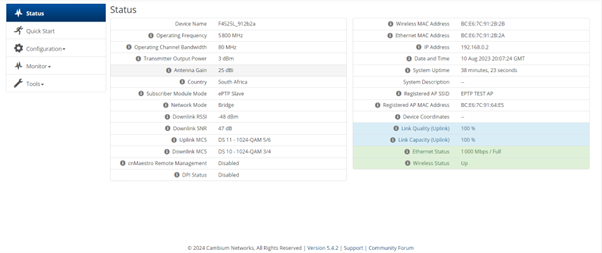
Once all the confirmation changes have been made, simply click Save. From either the SM or the AP you can view the status of the wireless connection under the Status tab.
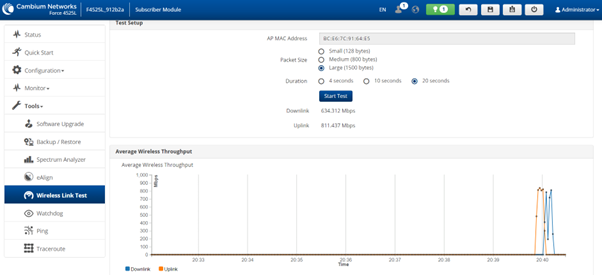
In our lab environment, we ran a Wireless Link Test, which is accessible under the Tools menu. We opted for 20 seconds duration with large (1500 bytes) packets and our downlink results were 643Mbps and uplink of around 811Mbps, providing an aggregate speed of 1445Mbps.
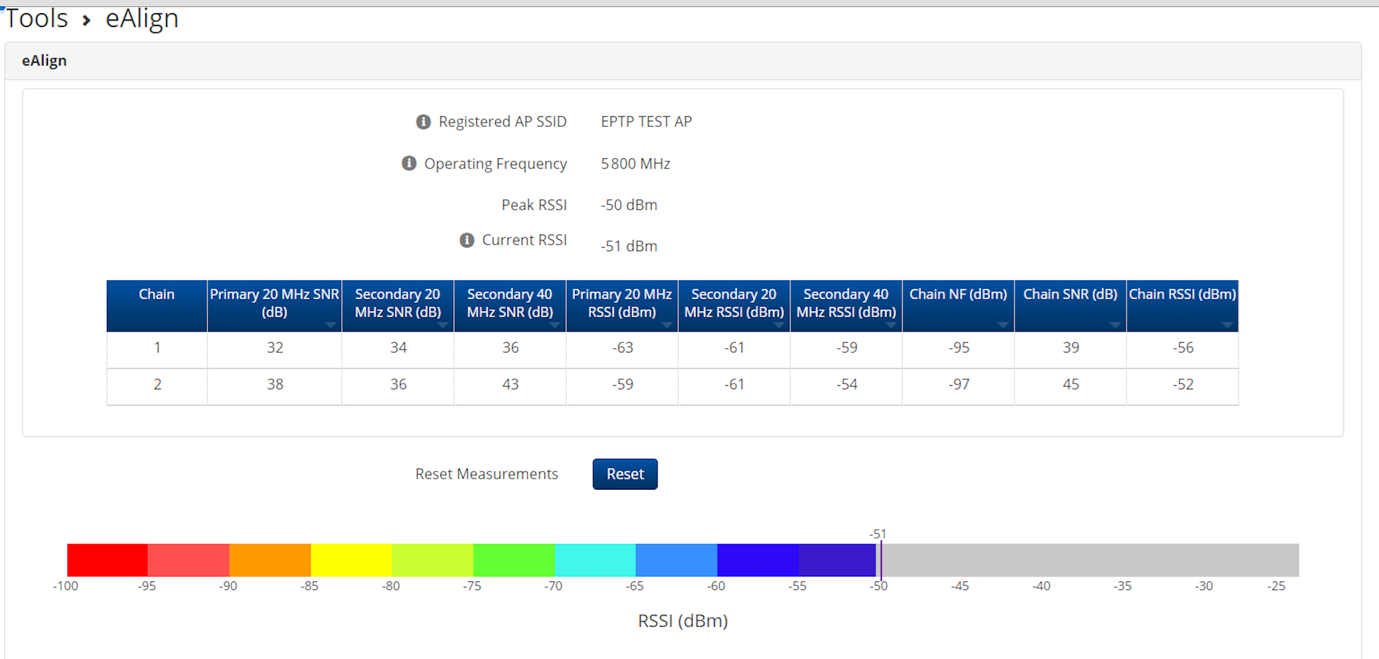
Another great tool that we recommend using when installing the CB-EPMP-F4525L in a PtP setup is the eAlign tool. This gives you a real-time indication of the Receive Signal Strength Indicator (RSSI). To maintain high modulation and maximum throughput, you want a value that is around -50dBm to -65dBm.
Did you know? We assist with Link Planning and Pre-Config. For Link planning, you can provide us with your installation co-ordinates for both AP and SM and installation height and we will use the Cambium Link planner to provide you with information such as the elevation and azimuth degrees, recommended installation height for a clear line of sight and bill of installation materials. The link planner results will also provide an estimated throughput based on different modulation options as well as the expected RSSI.
We can also assist with pre-configuring these units for you, based on your network information which allows you to simply install the devices. Reach out to us at support@miro.co.za for more information on link planning and pre-configuration.
Should you require any additional information or assistance, please get in touch with us by phoning 012 657 0960 or simply email sales@miro.co.za
Comments
View Comments